Frequently Asked Questions
For immediate assistance please call 1-800-874-6319 or email us at envelopeservice@lifeway.com.
What envelope stock colors do you offer?
Envelope are available in the following colors:

White with colored borders:

What envelope sizes do you offer?
Our most common sizes are:

However we offer various custom sizes. Please call 1 (800) 874-6319.
What are your dating options?
Our most common dating options are:

What are your numbering options?
We can number boxed sets and monthly mailing orders consecutively, from a list, or eliminate numbers all together.
What are your minimum quantities for bulk and box set orders?
Our minimum quantities for bulk envelope orders are:
Plain bulk- 2,200
Stock bulk- 1,100
Customized bulk- 1,000
Our minimum quantity on box set orders is 20.
What fonts do you offer?
If you have it, we can do it. Below is a list of commonly used fonts:

What are your most common ink colors?
We have invested in a state of the art computerized ink mixing station that allows Lifeway to offer every pantone ink color.
Below is a list of our stock ink colors:
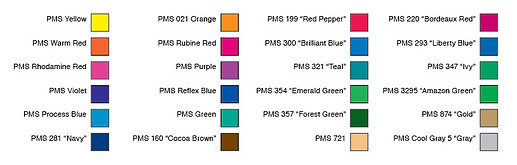
*Colors viewed on a computer monitor or laser copy are not true PMS ink colors and are shown here for representational purposes only.
How long does it take to start a mailing program?
Typically it takes two to three months; however, our mailing experts can convert a church to a mailing program in as little as two weeks.
What file formats can you accept?
We can take any Mac or PC version of Adobe Illustrator, Adobe InDesign, PDF, Adobe Photoshop, MS Publisher, TIFF, MS PowerPoint, or MS Word. If you have other file formats, we may be able to handle them, too. Just ask!
If all you have is a hard copy of your logo or design you can scan it and email it to us or fax it if that is your only option. Our Graphics Team can handle the rest!
If I am sending a Publisher file, should I compress it with Pack and Go, or should I just send the normal *.pub file?
While we can work with either type, we prefer to get the normal, uncompressed file. Please do not use Publisher’s “Pack and Go” feature. If you are sending Publisher files with linked graphics (generally NOT recommended in Publisher), please gather all the associated files into a single Zipped file, and send us that. Compressing files with WinZip or PK Zip (or StuffIt on the Mac) is also the preferred method for Quark, Pagemaker, Illustrator, InDesign or any file with linked graphics. If you are using a font that is not included with Publisher, please send it along with your Publisher file. You can either Zip them together, or upload the font as an additional file upload.
Do you have templates to help me correctly design my project?
Yes, templates are available for all of our envelopes.
Do I need to impose my business cards 8-up or 10-up?
No, send us a single layout of your job, we will handle any imposition needed on our end.
How can I tell what resolution my image or file is?
Some digital cameras will let you know what the image resolution is, while others will tell you what the pixel dimensions of your image are. If you know what the pixel dimensions of your images are either from the camera itself or through the image editing software, you can do a little math to determine the resolution, and the size you can print the image at for clear and crisp printing.
Simply write down the pixel dimensions of your image and divide those numbers by 300 if the image does not include text and 400 if the image does include text. For example: An image without any text has a pixel dimension of 600 x 900 pixels. Once each dimension is divided by 300 the result is 2 x 3 inches. This means that you can use this image at 2 x 3 inches or smaller in your layout for quality printing results.
If your image editing software does not tell you what the pixel dimensions are, but it does tell you what the resolution is, then you know the maximum size you can use that image in your layout. We recommend that images be at 300dpi in their final size in the layout and 400dpi if the images include text. Please keep in mind that resolution and physical dimensions are in direct proportion to each other. If you have an image that is 2×2 at 300dpi and increase its size in the layout to 4×4 the new resolution is now 150dpi. So remember, when you bring an image in to your layout you can shrink it down in size (because the resolution will increase) but you will be limited as to how far you can increase it in size.
How should I take pictures with my digital camera?
Digital cameras are wonderful tools that allow us to capture our images in many different ways. The camera is designed to actually take three pictures; one in red, one in green and the other in blue (similar to the way a projection TV works). It then combines the colors together and saves the image onto the picture card. It is very important to make sure that the camera is set to the highest quality setting possible. This means that if you can only save one image on the picture card instead of 12, 64 or 128 images, then this is good! You want to create the best quality picture that the camera can make. This will mean large file sizes and slow downloads from the camera itself, but it will get you the best possible results from your camera. Remember, images should be at 300dpi in their final size in the layout!
More often than not, we notice that images that come from digital cameras print darker than expected on the printing press. Check to see if you have a brightness option in your image editing program to lighten the entire piece. If you have the opportunity to change the color space from RGB (red, green, blue) to the printing press colors of CMYK (cyan, magenta, yellow, black), then do so! It is always better to have you change the color space if you can, than for us to do it. Remember, not all colors that you can see that are created by elements of light (RGB) can be created by the elements of ink (CMYK) on press. If you do not have this capability with your software, do not worry about it, we will change it for you for free!
What is the difference between the RGB and CMYK color space and why does it matter?
RGB refers to the primary colors of light, Red, Green and Blue, that are used in monitors, television screens, digital cameras and cell phones. CMYK refers to the primary colors of pigment: Cyan, Magenta, Yellow, and Black.
The combination of RGB light creates white, while the combination of CMYK inks creates black. Therefore, it is physically impossible for the printing press to exactly reproduce colors as we see them on our monitors.
Many programs have the capability to convert the layout/images from the RGB color space to the CMYK color space. We request that you convert your colors from RGB to CMYK if your tools allow you to. By doing it yourself, you have maximum control over the results. You may notice a shift in color when converting from RGB to CMYK. If you do not like the appearance in CMYK, we recommend that you make adjustments while working in CMYK (usually lightening).
Is there an extra charge for bleeds?
No. Unlike many other companies, all our prices include full bleeds (if required) free of charge.
How long does it take for me to get the proof of my job?
Once you have placed your order, you should get it within 5 business days after we receive your electronic files.
How well will my job match what I see on my monitor?
Because of wide differences in monitor calibration and the different technologies used, some printed colors may not exactly match the colors on a your specific monitor. We do our best to make your job look good.